


One of my favorite artworks of all time was taught to me by my 7th grade art teacher, Mr. Lenzo. We created face jugs using clay, drip glazes and even added marbles to the eyes for an amazing effect that my 12 year old self had never seen. It was clear that ceramics was his area of expertise. I don’t remember a lot about middle school (I think I blocked it out for self-protection…) but I definitely remember art class and I’ve never forgotten Mr. Lenzo.

http://www.peterlenzopottery.com/Peter_Lenzo_Pottery/Intro.html
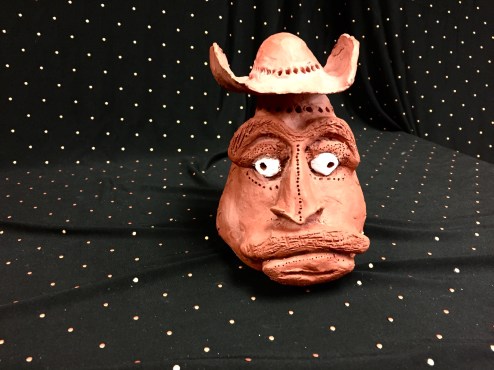
Face jugs has become my go-to ceramics lesson for all age levels. I’ve taught this to every grade from 5th-12th with amazing results. It is a great way to teach hand building basics: pinch pot, coil-building and how to score and slip clay.
After these basics are mastered, students are taught how to use their hands to model facial features. I love the wide range of abstract to shockingly real results. Students of all ages buy in to the process and can find a way to express themselves at their individual level.
Although working with clay is my favorite medium to teach, my favorite part of this lesson is the important conversation it brings up about American history. Face jugs originated in the United States by african slaves in Edgefield, South Carolina. We watch Jim McDowell explain the history and importance of face jugs in this video. His energy and passion for the subject is instantly absorbed by the students. They pick up quickly the serious nature of why face jugs were brought to our country and Jim McDowell gives the conversation authenticity that I am not able to create alone.

Sometimes I have students sketch ideas before we learn how to work with clay or sometimes we watch this video and sketch after students have worked with coils for a couple days.

Day 1: Pinch Pot & Clean-Up Expectations


The first day working with clay can feel a little hectic. I try to do prep in advance to make my life easier, like having student shelf assignments done or the supply tables organized before the day of. Students are mesmerized by the tactile quality of clay and some are turned off by it at first. Once students get used to the mess and how it makes their hands feel, they give in to the fun and messy nature of pottery.
Making a pinch pot is an easy introduction to clay that students can confidently create on day one. This tutorial sets the stage for great visualization before students get their hand dirty. After we watch the pinch pot section, I send students in groups to get their clay and clay supplies. I’ve learned that waiting until after the demo to get supplies helps keeps students’ focus on me and not all of the fun and messy things on their table.
A pinch pot does not take long to make and can easily be balled up and repeated if the first attempt needs improvement. I make an ordeal of inspecting each pinch pot and either saying “Great! Keep smoothing!” or “Sorry, ball it up and do it again.” I make sure to be kind and gentle to my students with anxiety, but most students get a real kick out of some brutal honesty.
Clean-up is the real focus of day one. I give students jobs: sink bouncer, paper towel giver, line leader, lotion kid and clay table organizer. I rotate through my early finishers or students that need a break from their seat and students love having a responsibility in the art room. I give dramatic examples of what NOT to do (eat the clay, throw pieces of clay onto the ceiling, write “Timmy wuz here” with clay on the table) to bring some humor to the seriousness of messing around with expensive materials. By this point in the school year students know that I have no problem calling parents or assigning consequences so they are usually on their best behavior (at least for the first few days of clay…).
Day 2: Coil-Building


We start by watching this video from the start (makes a great pinch-pot review or introduction for absent students!) to the coil-building section. Once questions have been answered and supplies have been retrieved, we roll a coil together. I love to demonstrate the what not to do coil and show an upsettingly uneven and short coil. Students either get the hang of it immediately (thanks, Play Doh!) or struggle with the hand movements. I am constantly moving throughout the room and getting my hands dirty with individual instructions. Students make as many “rings” as they have time and clay for. The fastest student usually makes five in a class period and the slowest student gets one. We don’t score and slip anything on the first day so that students have time to practice the technique without feeling like they have to master it.
Day 3-4: Score, Slip & Blend

“Score, slip blend! Score, slip, blend!” I have students repeat after me almost like a chant. Clay only sticks together when it’s wet because of the moisture. Students love the story of a student’s face jug’s eyeballs falling out while I was grading it because he forgot to score, slip AND BLEND! The first day we watch this tutorial from the score and slip section until the end.
Students use one of their rings from the previous class period and we do the technique together. They watch me on my Elmo document camera as they follow along with their own clay. I stop and check score marks because students are often timid about digging into the clay and overlapping score directions. I often have to remind students to make sure their score marks touch each other so the slip can “glue” each piece together.
The first day students will score, slip and blend around three of their coils to their pinch pot and move upwards. If a student only made one successful ring or was absent, students roll coils until they have enough to work with.
Day two moves much quicker. I do a quick verbal review with my tutorial playing on a silent loop on the TVs as they work. I tell students to not make a lip yet, that will be a finishing touch, so that their hands can get inside their jug when they add their facial features next time.

Day 5: Eyebrows & Noses

I used to start with the eyes, and students totally freaked out. I still have them use their thumbs to press their clay in to create eye sockets first, and many students totally panic. It takes awhile for them to see that their clay is more durable than they think.
Eyebrows are an easy starting point because it’s just two really small coils, which they are already masters at making! I reiterate (every.single.day.) the importance of scoring and slipping even the smallest additions. I show students how to use clay tools (we use a shishkabob stick instead of a needle tool!) to create texture on their eyebrows.
Noses are a little trickier. I have students roll a coil and then set it on their face jug between their eye sockets. I ask them: “is it too big, too small or just right?” and then show them how to add or take away clay until their happy with the proportions.
We sculpt the nose coil into the shape of a carrot by pinching and then tapping the other end on the canvas to create a larger end. At this point we score and slip, and then it’s time for the fun part. I love watching their reaction when I stick the shishkabob stick up my face jug’s nose to create nostrils. I demonstrate how to gently pull to the side to create a more organic shape and not just two perfect circles.
The nose is a little tricky and I tell them they can start over and remake it…TOMORROW! Sometimes students ball up their noses right away and then are like wait…how do you make that again? Waiting to start over until the next day discourages passionate revisions they may later regret.
Day 6: Mouth & Eyes
Creating a mouth is easy as pie once you have the nose out of the way. I demonstrate how to make two coils that get smaller on each end. We discuss how the bottom lip is larger and talk about the “cupids bow” that connects the nose and mouth. Students have fun playing around with mouth expressions, and this is when students realize they can add teeth and tongues.


They eyes I’ve learned to save for last. I show how to roll a marble or sphere of clay. Take it from me, don’t say balls. Never say balls in art class. We do the same size check by placing it in the socket and asking “too big, too small or just right?”. Then I demonstrate how to cut the sphere in half so there are to emerging eyes coming from the indented eye socket.


At this point we score and slip, no revisions until tomorrow! I then show how to make the tiniest part of all, the top eye lid, reiterating how important it is to score and slip. Drawing the pupil is always a fun part because students’ face jugs just come to life.
If there is time I show them how to create a handle using the same coil building technique they’ve been practicing for days. The biggest struggle students have with handles is size relationships. They tend to make these really thin, akwardly large sticking out handles.
Day 7-9: Texture & Fancy Stuff
This is my favorite stage of this artwork. Students are confident and totally self-sufficient at this point. The creativity just explodes as students are given time and clay to make their face jugs unique. The extra details and carved designs are always fresh and exciting, no matter how many hundreds of face jugs I’ve seen students create!


Glazing, Painting & Clear Coats


In my former life, I was a high school ceramics teacher. My move to Oklahoma put me in an intermediate school that doesn’t have a kiln. Honestly it was a little bit of a relief to not be kicking around clay dust all day, but I am so excited to have found Amaco’s Air Dry Mexican Pottery for this artwork.
It has almost the identical texture and color with the Amaco red low fire clay I used to buy back in South Carolina. It’s the real deal and it doesn’t even need to be kiln fired.
Thanks to a supportive PTO and students obsession with buying Takis and Jolly Ranchers on concession stand Fridays, I was able to stock up with air dry clay for the whole school year.
I’ve experimented with acrylic paint, watercolor and oil pastels for surface decorations with mixed reviews. I think the oil pastels are the easiest to work with without turning the clay into a kindergarten Mother’s Day painting gone wrong.
With low fire clay, I LOVE using Amaco’s underglazes, which is basically just clay with a pigment mixed in. Students can easily paint small details and then once it’s dry put a clear glaze on the entire surface.
Subscribe to this blog for more art education resources and visual art tutorials!
What’s your favorite way to create with clay?
Is this your first encounter with Face Jugs?
