


I am hoping this school year will be one for trying out brand new ideas or bringing back old favorites. Nothings stretches your imagination like teaching during a global pandemic, right?
I always want my students to have opportunities to create sculpture. In 2020, a social distanced art room is very different than the hustle and bustle of a clay clean-up from the past.
How will students create sculptures if they can’t share materials?
How can 30 students wash their hands at one sink?
What if we switch to distance learning in the middle of a project?
If I had the answers to all of these (and so many more) questions, I’d write a book immediately. One thing I do know for sure is the success of this year is dependent on flexibility, patience and building relationships with students. I know many art teachers, like myself, are searching for 3-D artworks. Teachers want to keep their students engaged even with the limitations set upon us. I may not get to teach this lesson this year, or any lesson I’m used to, but I am trying to stay calm and creative.
This artwork requires very little clay and can be done at home or in the classroom with Amaco Air Dry Clay. It is a great opportunity to explore rich art history connections and student’s can express their own thoughts and experiences using the human figure.
This post contains affiliate links to products I truly love and use in my classroom. If you use these links to buy something we may earn a commission at no additional cost to you. #artteachersidehustle
Video Lesson
If you want to jump ahead to how this sculpture is made, here is the video link I will be referencing throughout this post. It is 100% classroom ready!
This is a detailed tutorial is step by step and can be broken into chunks as your students (or yourself!) complete each section.

Brainstorming
My main goals with this lesson are to help students understand three dimensional proportions and how to use the human body to show emotion or expression.
I like to use this focus question: What is it like to be a young person in the 21st century?
I start by having my students write, reflect and discuss the many ways they feel in a variety of situations. Sometimes students do a written reflection and sometimes I have them jot down ideas as I verbally throw out scenarios. I try to push them past basic words like “mad” or “sad”.
Once they have a few experiences and descriptive words written down, we then discuss how they can shape the human body to express that feeling. If you want a really fun class activity, have students suggest emotions and then have a student pretend they are a sculpture and strike a pose. This can be done as a whole class or in a small group, and YES it does get silly and YES it can get loud. It’s a great opportunity to get students moving and thinking about posture. It can also be a great way to incorporate gesture drawing. It all depends on your age group, unit goals and time constraints.
Personal Expression
Students will often want to focus more on the movement of the figure and not the expression behind it. I have to work students through the thought process of using that action to express how the person is feeling. Students love to tie in sports and often want to use props which I try to to avoid. Simple is best when working with the human figure for the first time.
So if a student is stuck on “I love soccer so my sculpture is kicking a soccer ball” we talk through how would you feel at the moment you kick the ball? Would you feel determined, anxious, confident etc.? Some students fall in love with the concept immediately, and they have an entire army of expressive poses to choose from.
Because I want them to use their own personal experiences in today’s world, I show them a variety of sculptures by the talented artist Elizabeth Catlett.
Artist in Focus: Elizabeth Catlett

Elizabeth Catlett’s powerful sculptures are a perfect example of using the human figure for expression. Catlett used the female figure to convey her experience as a African American woman and mother. I love using her work to remind students of important historical time periods in America. Catlett was the granddaughter of slaves and this deeply informed her artwork, not to mention growing up as a black female in the 1930s.

I don’t shy away from these conversations in art class because the artwork would not exist without the context. Elizabeth Catlett’s personal experiences are how her sculptures come to life, and this really helps students understand expression and how they can use their own personal experiences in their artwork.
Students will always pick up on the feminine curves Elizabeth Catlett emphasizes. Some of her sculptures can have very defined breasts so keep that in mind when selecting images. I like to point out from the start that although her sculptures are abstract and simplified, she gives us enough information to know what they are feeling.
A fun activity is to have students compare and contrast Catlett’s figure sculptures to Alberto Giacometti’s hauntingly slender figure sculptures. He is another artist that uses the figure to explore the human experience and pairs well with the discussion of how art can represent time, people and place.
I love to show students new artworks that they have never seen before, but I also think it’s important to throw in some of the famous artworks they may be more likely to come across such as Rodin’s The Thinker. This is another example of an artist that was inspired by the human condition. His sculpture represents the chaos and horrors following the French Revolution.
Students will absolutely notice that The Thinker is naked. Like Giacometti and Catlett you can’t see any defined nude body parts, but unlike these two artists The Thinker is super realistic.
I like to hit this on the head by having students write down three observations as a warm-up and then sharing them out loud. You can almost always count on a student saying “he’s naked!” during the discussion. If this doesn’t happen, I will say “I’m sure you noticed that he is not wearing clothes.” This usually gets some smiles and laughter. Sometimes I say “nakey” because I’m a ham and I can’t help myself.
To work through this topic, I show this video from the North Carolina Museum of Art.

It’s short, concise and brings up so many great points about Rodin’s choices (such as no clothes). I do warn my students that the narrators voice is a little dry, but don’t let that fool you because he brings up several interesting points.
I do a daily sketchbook warm-up with my students over the course of the project and sprinkle these activities in throughout the process of sculpting. It would be really tedious to spend one entire class period trying to cram in all of these ideas. I’ve learning to chunk bits of information, looking at new artworks and practicing the Feldmans Method of Art Criticism into small doses. This helps keep kids interested and ensures art history and criticism standards are presented on an almost daily basis.
If you are loving this concept but don’t have access to clay, try out this Paper Mache Action Figure.

Materials:
I have taught this lesson with kiln fired clay and air dry clay. I love Amaco’s Mexican Pottery air dry clay because it feels exactly like kiln fired clay with striking results. I also love the low drama of air dry clay. There’s no kiln explosions or sleepless nights that your school is burning down.
It’s also convenient for distance learning. I taught high school ceramics for six years before moving states and I’ve been asking myself for months WHAT would I have taught during distance learning?!
I know most students do not have air dry clay at home and so many cannot afford the price. This is not your Walmart level modeling clay- it’s legit!I’ve seen a lot of teachers posting about sending home art kits and a hunk of this would go a long way.
My school district is planning on opening in person (I’ll leave my personal opinion out of it) and I know my regular coil building project won’t fit into our new normal. I am hoping I can at least break out the clay with my one section of advanced art this school year.


Legs

1. Start by rolling a coil that is about the width of your thumb. Make sure to wedge your clay first so there are no hidden air pockets.
2. Your coil needs to be thicker in the middle (hips/rear end) and thinner at both ends (ankles)
3. Fold your coil in half to create your legs.
4. Carefully bend each foot up to about a 90 degree angle. Use your fingers to sculpt the ankles and feet as desired.
Torso

1. Pick up a piece of clay and hand mold it into a triangular shape. Your toros needs to be about half the length of your legs. Your head will make up the rest!
Arms

1. Roll another coil that is thinner than your legs. Use your index, pointer or pinky finger as a guide.
2. The length does matter, but don’t worry about that yet. I like to shape the length and the hands after I’ve attached each arm to the torso. Sometimes I use one long coil and sometimes I break it into two pieces.
Head & Neck
1. Form a sphere (art teachers: never say balls in art class) that does not expand past your shoulders.
2. Carefully pull some of your clay down to form a neck. Use your hands to mold it into the form you want. It can be abstract and more circular or you can spend time forming a chin and more skull like shape.
Pinch Pot Base
I like for students to create a pinch pot to use as a base. It is very difficult to create a standing figure with these proportions, so we mainly focus on seated or reclining figures.
You can create a self supporting figure, but my students find more success when they have base to work with when finding balance.
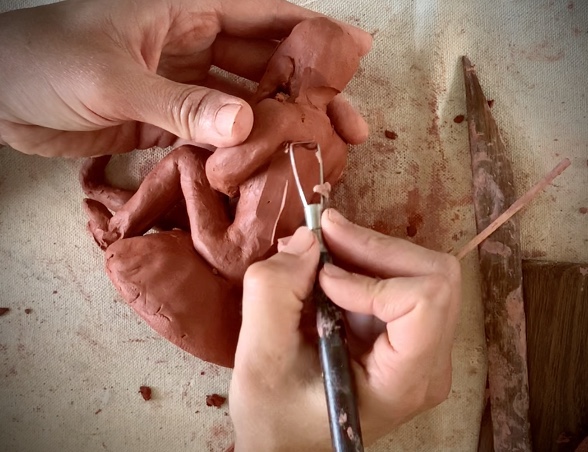
Score, Slip & Blend
Now that you have all of your pieces and their size relationships are correct, it’s time to start attaching everything.

I have students use their own small containers of slip and a paintbrush to connect their pieces. A bamboo skewer is a cheaper and safer alternative to needle tools and they last a really long time.
Pose & Expression
Once everything is carefully attached and blended together, it’s time to start finding a pose. Sometimes students know exactly what they want and sometimes it changes as they work with their figure.
Keep in mind elbows and knees need to have a sharp angle at about the halfway point of the arm.
(Many times this is done on the second or even third class period. As long as clay is sprayed and put in a bag at the end of each class, it should be ready to sculpt the next class period!)
Smoothing & Perfecting

This sculpture is “in the round” and needs to be looked at from all angles as students create their posture.
I like to use a paintbrush or my fingers to smooth my clay and make sure all of my body parts look correct. I could spend forever on this, and sometimes have to encourage my students to be picky with their surfaces. Although smooth is just one texture, if it’s supposed to be smooth it better be smooth. You can use a variety of tools to carve in textures and details. I like to keep mine really simple and just focus on the pose.
Once it’s almost dry, you can use a dry paint brush to clean up any little crumbs of clay leftover.

The beauty of air dry clay is that you don’t have to put it in the kiln! I love using red clay because I think it looks really nice by itself or with small enhancements. I personally think red kiln fired clay makes glazes look so much richer and vibrant.
Gloss Spray

A quick two costs of spray gloss is a cost effective and way to seal clay and give it that shiny coat that mimics glaze.
If you are feeling adventurous, have them make more than one! Several figures interacting on the same base is a great way to level up expression and teach students how to work in a theme.
What clay lessons are you adapting for this school year? How do you get adolescents to talk openly about the human body? I’d love to hear from you!


Subscribe so you never miss a post. ❤️🎨👩🏼🏫
