

Found object assemblage sculpture is one of my all time favorite lessons. They are budget friendly and a great introduction to composition, which can be a tricky topic in the art room. I love seeing my students’ inner scavenger come alive. There are so many directions to take a found object assemblage and many contemporary artists to draw inspiration.

If you have a short attention span like I do, this short video will show you every step:
I like to focus on an abstract style inspired by Louise Nevelson’s monochromatic assemblage sculptures. Nevelson is one of the most innovative sculptors and my students enjoy the abstract qualities of her assemblage. It can be a relief when art doesn’t have to “be anything” or look like something in particular.
Found Object Assemblage Artists to Explore
- Louise Nevelson
- John Outterbridge
- La Wilson
- Tom Lasley
- Robert Rauschenberg
- Betye Saar
- Joseph Cornell
We looked at Louise Nevelson, Betye Saar and Joseph Cornell. We do daily art history warm-ups that help students develop their art criticism discussion and writing skills.


Found Object Assemblage Tutorial
This classroom ready (or distance learning!) tutorial will show you every step I take with my students for this found object assemblage lesson using a relief technique. All you need is a piece of base cardboard (Amazon boxes are my go-to) and Elmer’s glue. Seriously, Elmer’s glue will work with 99% of objects. Hot glue or super glue can be used for sturdier items, but we rarely deviate from old fashioned Elmer’s.

I also like to switch things up and have students create 3D boxes to organize their objects. This is great for the secondary setting and pushes the sculptural element even more. Try this tutorial to create your own box, it’s super easy!

Part One: Organizing Composition
Cardboard is a great material for assemblage sculptures because it is lightweight, FREE, and readily available. Perfect for a public school art room! I have also done this sculpture with wood, but that was back in the day when my former high school had a woodworking class. I really prefer cardboard because it is way more user friendly and students can use scissors to cut and adjust their own shapes.
I start by giving students a pre-made cardboard base. The size and shape depend on what cardboard I have stockpiled. I try to keep things consistent, but I don’t always have good aim with the cutting board. The last time I did this artwork I had a ton of unused pizza boxes leftover from a school wide fundraiser. SCORE!
One the first day, I give students these guidelines:
- Include one diagonal shape
- Include one horizontal shape
- Include one vertical shape
- Extend off the edge at least once
- Cover 75% of your base with these shapes


Some students love this step and the concept clicks immediately. Students that have a natural understanding of shape and organization tend to grasp the concept right away. Some students are totally thrown off by the non-objective quality of the composition. I always have at least one student who wants to draw out a smiley face or something else recognizable. I try to reinforce the concept of composition, or arranging elements, and that this will be the organization that keeps the sculpture from looking like a hot mess.
3D Box Construction
A fun deviation for this project is to have students create their own boxes using cardboard. We did 8×8 inch boxes and used Xacto knives, masking tape and the optional hot glue.


Students measure their base on the edge of a larger piece of cardboard and I have students the same measurements. I told students that their box did not have to be a uniform size and that if they wanted to branch out, I supported them but would not help with the math. (#cantmath).
Once their base is measured, they cut four uniform rectangles for the edges of the box. We did 8×3 inches, but these measurements can be adapted. We used masking tape to attach all seams (front and back) and the boxes were sturdy as heck! My video tutorial really helped students who needed extra guidance with the measurements.
Smaller Shapes, Texture & Basic Found Objects


Next is smaller overlapping shapes and texture. When I taught on a block 90 minute schedule, I did all of this in one class period. Now that I am in a 45 minute schedule I break it up into two sessions. I always remind students to keep things neat and organized, because although we are recycling “junk” materials, we don’t want it to look junky. Organization is key! I also introduce some found objects at this point.
I usually have some random things collected like water bottle tops, string, broken pencils, popsicle sticks etc. I like to introduce Louise Nevelson and the concept of found objects a couple days before they will use them. It usually takes a couple days for them to trickle in. And yes, sometimes the found objects never arrive. I put that as a category on my rubric.


I reinforce loudly and often that the personal found objects really make the assemblage. As the teacher I will provide a few things, but the area of emphasis, or focal point, really depends on their scavenging skills. A fun warm-up for a younger group is to show them images of assemblage sculptures of former students and say “I spy with my little eye…” and pick found objects for them to search for. This is a great way for them to observe assemblage art and get the wheels turning in their head for what they can find for their own artworks.


We also discuss theme at this stage. Depending on your age group, you can really invest time in having students use objects that represent a broader theme. Or, you can give all of your students the same theme if you are teaching younger grade levels or short on time. Some themes my high schoolers explored are nature vs. man made, technology, communication, recycling, things that are discarded or thrown out, environment issues and consumer culture.
Monochromatic Painting
This is always a transformative moment for students. Everything seems chaotic and junky, but a monochromatic layer of paint provides instant unity. Unless you have 90 minute class periods, even the fastest student rarely finishes this in one session. I like to start painting before all found objects are glued down. This provides a nice blank canvas for the important found objects for students to explore emphasis.
I encourage students to rotate their artwork as they paint to find all of the cracks and crevices. Not all materials absorb paint in the same way, but cardboard is really easy to paint! We use acrylic paint that dries somewhat matte. I’ve used a glossy oil based paint before and we sometimes spray or paint a clear gloss coat on top. It all depends on the look (and budget!) you want to achieve.


Another option is spray paint. This is much quicker with excellent results, but there are limitations. I find this to be a much more expensive option and I have not always had an art room near an exterior space. This option also requires a more enhanced level of trust of your students. It all just depends on where you are in your art teacher life :).
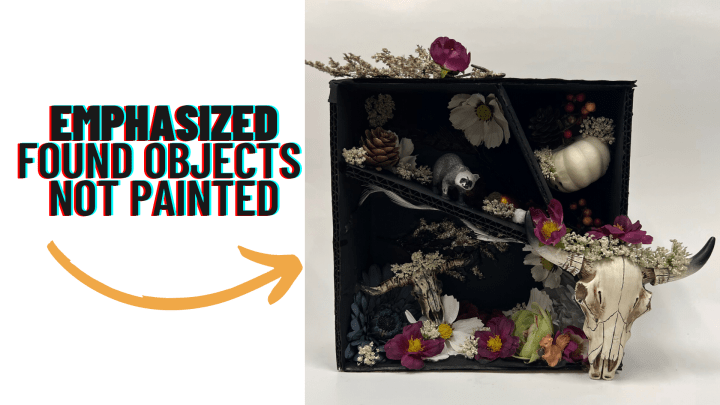
To Paint or Not to Paint
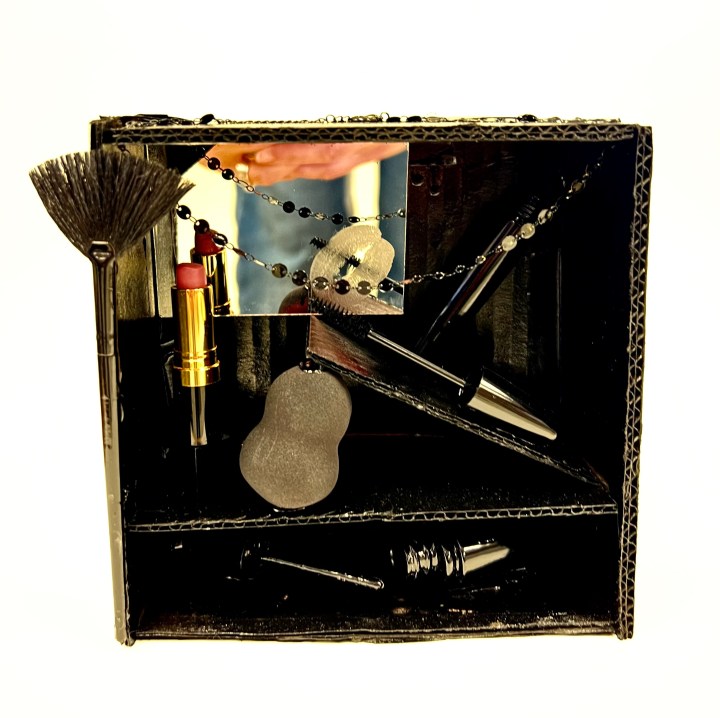
Louise Nevelson is famous for her monochromatic sculptures that mask or alter the identity of her objects. Some students really respond to this aesthetic, while others want to create more emphasis or let certain objects stay pure to their ready-made look. I give students the option to paint their assemblage monochromatic, glue objects after it’s all painted so they stand out, or add metallic dry brush details for subtle highlighting. Each technique has its own benefits and I like students to explore their own choices.


Found Object Assemblage Display
This year, we are connecting all of our boxes to a piece of plywood and all students will have their found object assemblage sculptures on display at our district art show. These make knock-out stand alone pieces, but the group element is a great connection for students. I was so happy at the sense of pride my students had when seeing them displayed (just in my classroom!) as a cohesive unit. Pictures coming soon!
Relief Technique Finished Pieces


3D Box Finished Pieces


Subscribe so you never miss a post!
Try out this modular sculpture for another inexpensive sculpture lesson.


One thought on “Found Object Assemblage Sculpture”